
In a world of hybrid work, a meeting that just works is everything. A top-notch conference room AV setup is the secret sauce, getting rid of those all-too-common headaches like glitchy video, muffled audio, and controls that feel like you need an engineering degree to use. Let's turn your meeting space from a source of frustration into a hub for real collaboration.
To get started, explore our complete collection of AV solutions.
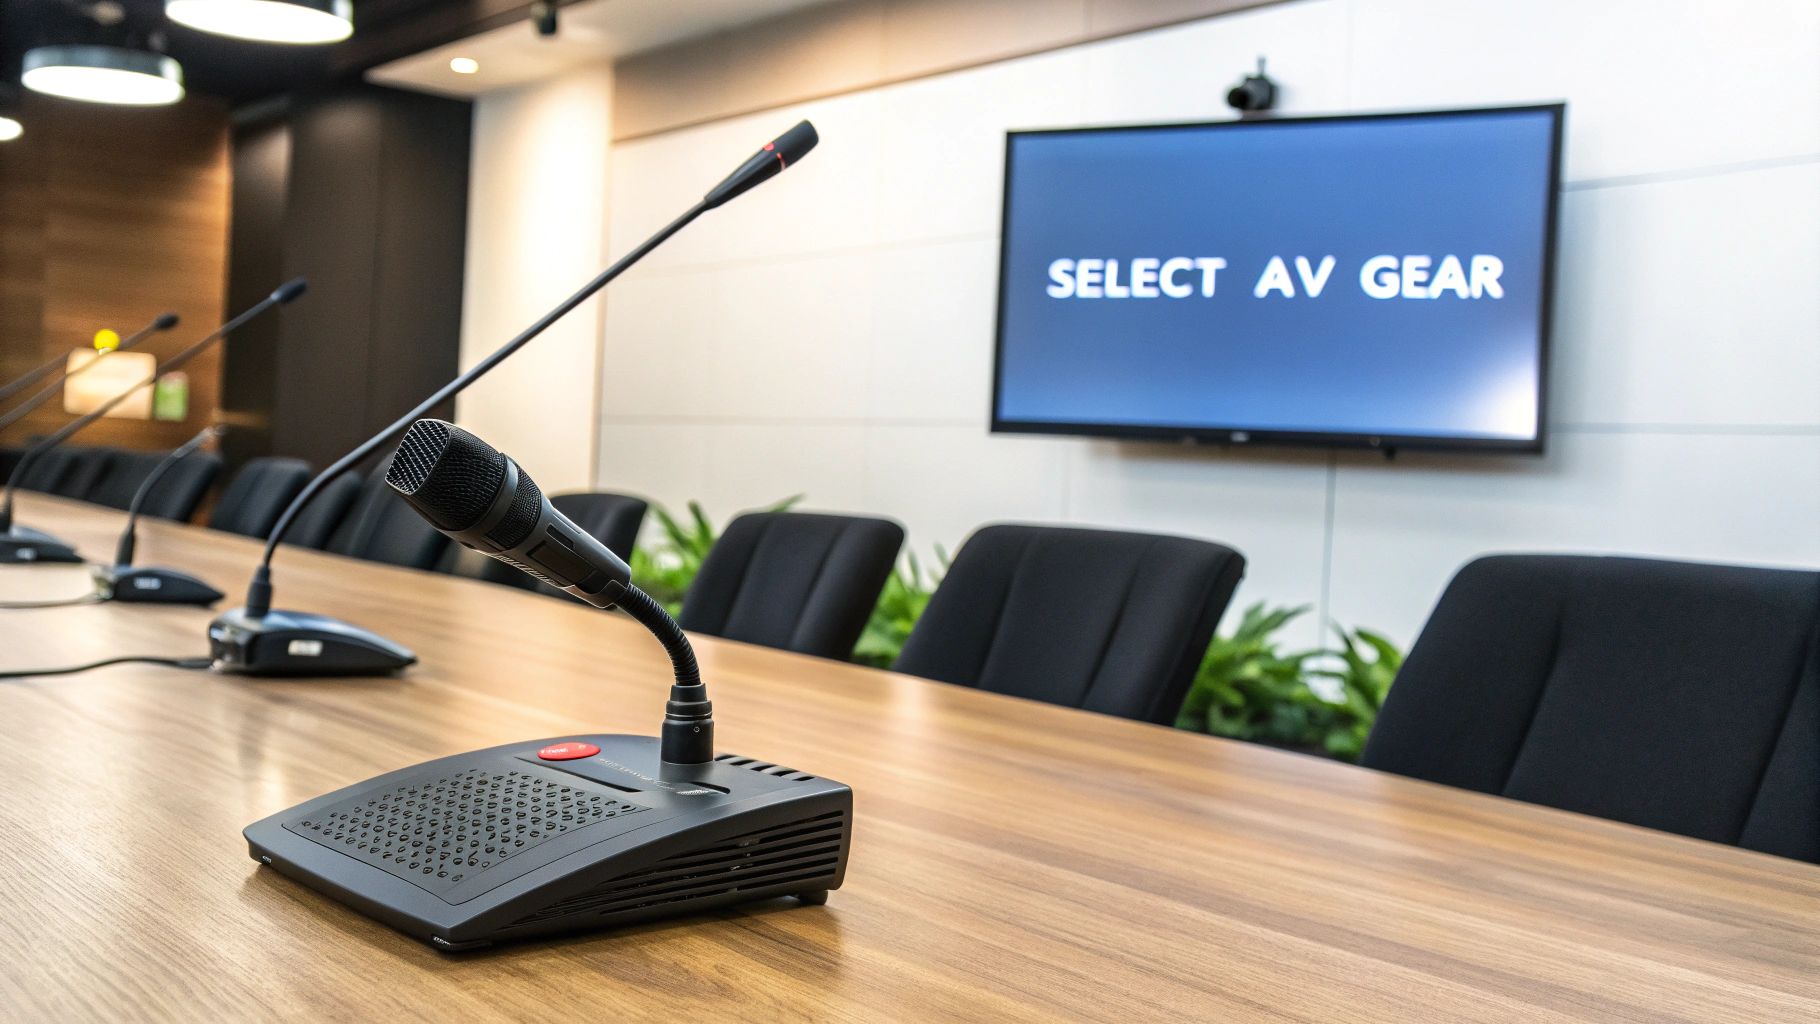
Building Your Modern Meeting Experience
A great conference room AV setup is so much more than just a big screen on the wall. It’s an entire ecosystem of tech, all working together behind the scenes. When you get it right, the line between who's in the room and who's joining remotely completely disappears.
And this isn't just a "nice-to-have" anymore. With 78% of organizations relying on video conferencing software, a solid system is a straight-up business necessity. I've seen countless installations, and this guide is about sharing what actually works in the real world—so you can build a system that helps your team get things done.
The Foundation of a Flawless Setup
Every successful AV system I've ever designed or installed is built on the same core components. If you understand what each piece does, you're already halfway to making smart choices for your own space.
These are the non-negotiable pillars of any reliable setup:
- Brilliant Displays: We're talking high-resolution screens or projectors that make every detail pop, even if the sun is streaming through the windows.
- Intelligent Cameras: Think beyond a static webcam. Modern cameras can automatically frame the person speaking or capture the entire group, making the experience feel more like a real conversation.
- Crystal-Clear Microphones: Whether it's a sleek unit on the table, something mounted in the ceiling, or built into a video bar, the goal is the same: pick up every voice without any echo or background noise.
- Intuitive Control Systems: The best systems let anyone—and I mean anyone—walk in and start a meeting with a single tap. No more fumbling with remotes or calling IT for help.
A well-designed AV system should be invisible to the user. The technology should fade into the background, allowing the focus to remain on the conversation and collaboration, not on troubleshooting equipment.
Ultimately, the goal is simple: create a room where technology makes people more productive. By getting these fundamentals right and planning ahead, you can dodge the common mistakes that lead to clunky, inefficient meetings. Next, we'll dive into how to pick the right gear, install it properly, and get everything talking to each other perfectly.
Want to see some of these technologies in action? Explore our complete collection of AV solutions.
Designing Your Room for AV Success
Before you even think about unboxing a single piece of equipment, let's talk about the room itself. This is, without a doubt, the most critical part of a successful conference room AV setup. The physical space dictates everything that follows, from the type of display you need to the microphone solution that will actually pick up everyone's voice clearly.
I've seen it happen time and time again: people skip this foundational step and end up with costly fixes and persistent frustrations. It's like building a house without checking the land first.
The hard truth is that even the most expensive, top-of-the-line AV gear will fail to impress in a poorly planned environment. Think of it as a partnership; the tech needs the right physical conditions to deliver that seamless experience you're after. This means taking a good, hard look at your room's dimensions, its acoustic properties, and the lighting you'll be dealing with day in and day out.
Assessing Your Room's Layout and Dimensions
The size and shape of your conference room have a massive impact on every piece of AV you'll choose. A long, narrow boardroom presents completely different challenges than a small, square huddle space. So, grab a tape measure and get the room's length, width, and ceiling height.
These numbers will directly influence your biggest decisions:
- Display Size: A great rule of thumb is that the person sitting furthest away should be no more than four to six times the screen's height from the display. In a 30-foot-long room, a 55-inch TV just isn't going to cut it for the people in the back.
- Camera Placement: You need a camera with a field of view wide enough to capture everyone at the table. For a small room, a wide-angle lens is perfect. But for larger spaces, you'll need a camera with pan, tilt, and zoom (PTZ) capabilities to properly focus on who's speaking.
- Microphone Coverage: In that long boardroom example, a single microphone in the middle of the table will leave people at the ends sounding like they're in a tunnel. You'll need to plan for multiple microphones or even a ceiling-mounted array to get even audio pickup.
Getting this right from the start is crucial, especially as more companies invest heavily in their meeting spaces. The conference room audio-video system market was valued at around USD 0.34 billion and is expected to rocket to USD 0.90 billion by 2033, growing at a healthy 12.2% CAGR.
Conquering Acoustics and Lighting
Poor audio and washed-out video are two of the most common complaints I hear about meeting rooms. More often than not, the room's surfaces and light sources are the real culprits, not the gear.
Here’s a simple test: stand in the middle of the empty room and clap your hands loudly. Do you hear a sharp, lingering echo? That's reverberation, and it’s the absolute enemy of clear audio. Hard surfaces like glass walls, concrete floors, and bare tables are notorious for bouncing sound waves around, making it a nightmare for microphones to capture clean audio.
The best AV setups feel effortless because the room itself is optimized for performance. When you manage acoustics and lighting properly, the technology doesn't have to work as hard, resulting in a more natural and reliable experience for users.
Luckily, there are some straightforward fixes:
- Acoustic Panels: Placing sound-absorbing panels on walls or the ceiling can dramatically cut down on that echo.
- Rugs and Carpeting: This is one of the easiest ways to tame reverberation. Soft flooring makes a huge difference.
- Furniture Choices: Upholstered chairs absorb far more sound than hard plastic or leather ones.
Lighting is just as important. A room with floor-to-ceiling windows might look fantastic, but all that natural light can create killer glare and wash out a projector screen. In a room like that, a high-brightness commercial display is a much smarter investment. Take a moment to see where glare hits your screen and consider adding blinds or shades to control the light.
And to make sure you have the right foundation for your visual setup, our comprehensive guide to TV and commercial display mounts can help you find the perfect mounting solution for any display type.
Selecting the Right AV Components
Once you’ve got a solid room plan sketched out, it’s time for the fun part: picking the actual hardware. This is where you take all that analysis about how the room will be used and turn it into a shopping list. The goal is to find components that not only perform well but play nicely together, creating a system that’s powerful for the pros but dead simple for the casual user.
The market for this tech is huge and only getting bigger. We're talking a global conference room equipment market valued at $15 billion, which is expected to climb at a 7% clip to hit nearly $25 billion by 2033. That boom covers everything from microphones and speakers to sophisticated displays. You can dive deeper into these trends and see the full conference room equipment research.
More options are great, but it can also lead to decision paralysis. Let's break down the key pieces of the puzzle to make this easier.
Displays: The Visual Centerpiece
The display is the anchor of the room. It’s the window that connects remote colleagues and the canvas for every presentation. Your choice here really comes down to two main contenders: commercial displays or laser projectors.
- Commercial 4K Displays: For most small to mid-sized rooms, this is your best bet. They’re bright, sharp, and handle ambient light like a champ. Unlike the TV you have at home, these are built for the long haul, often rated for 16/7 or even 24/7 operation.
- Laser Projectors: When you need an image bigger than 100 inches for a large boardroom or training space, a laser projector becomes the more practical and cost-effective choice. Today's models are incredibly bright and boast a maintenance-free lifespan of 20,000+ hours, so you can forget about the days of swapping expensive bulbs.
This image lays out the process perfectly, starting with measuring the space and ending with making sure everyone can be heard clearly.
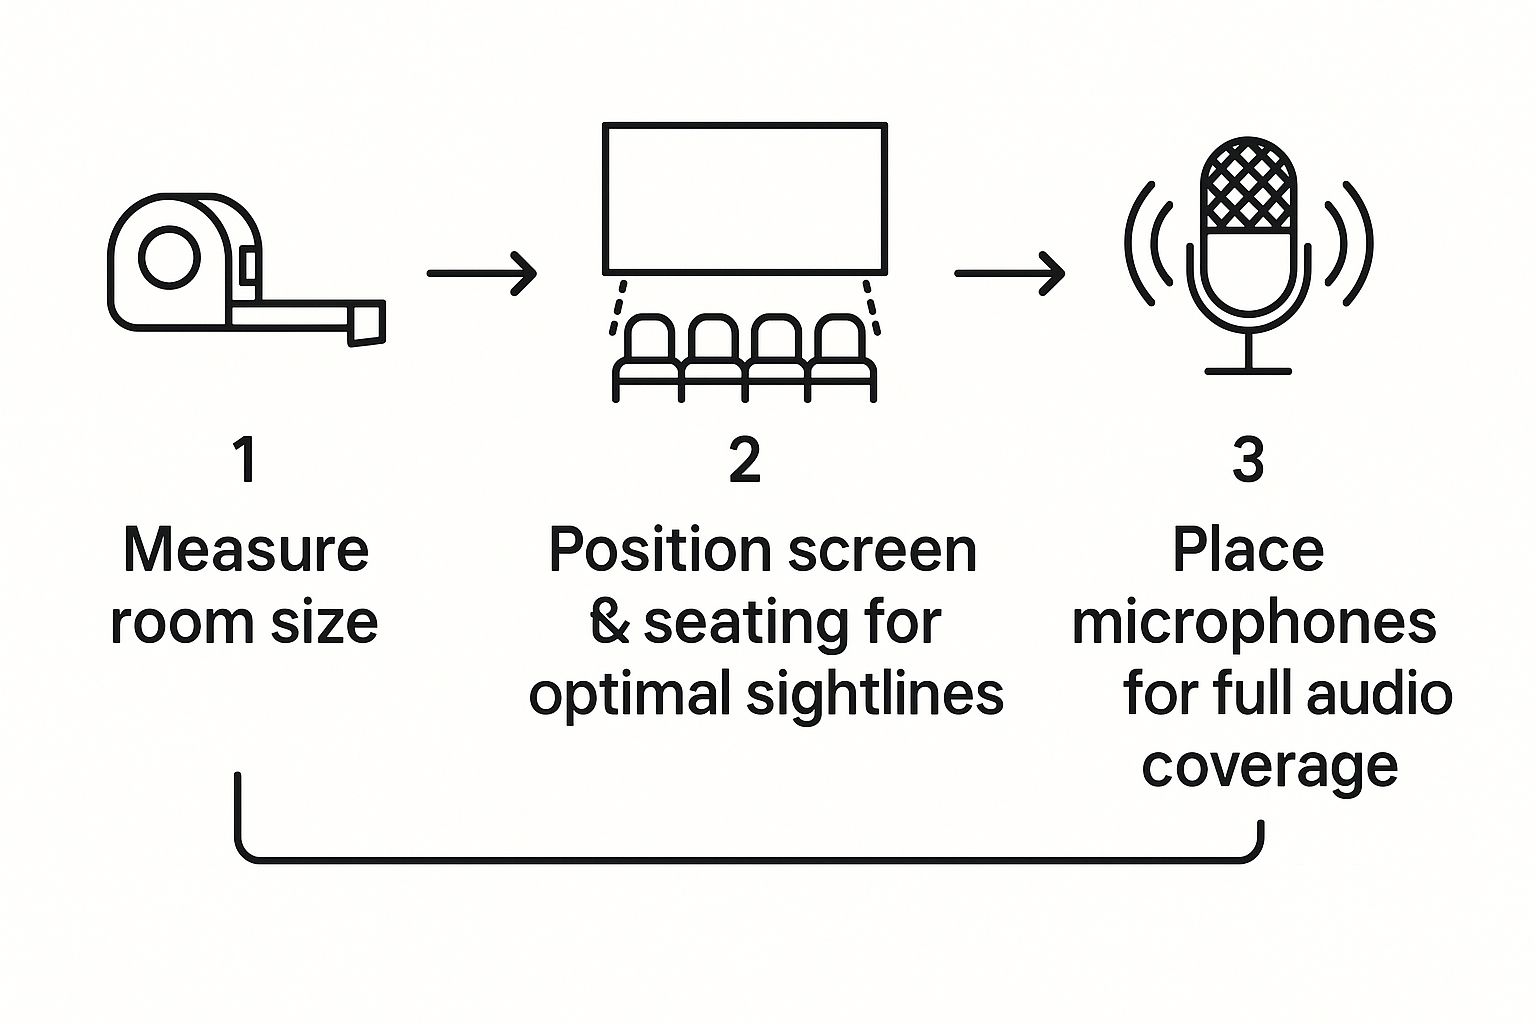
It’s a great reminder that a successful AV setup starts with understanding the room itself, long before you unbox any new tech.
Cameras: Bringing Remote Teams Into the Room
The camera is what makes remote participants feel like they’re actually there. A cheap, grainy camera is a surefire way to make them feel disconnected. Your choice here is almost entirely dictated by the size of the room.
For a tiny huddle space with 2-4 people, a good webcam with a wide-angle lens can get the job done. For any room larger than that, you need to bring in the bigger guns.
A Pan-Tilt-Zoom (PTZ) camera is a total game-changer for mid-to-large rooms. Instead of a static, wide shot that makes everyone look tiny, it can physically move and zoom in to frame the person speaking or capture the whole group. It creates a far more engaging and professional experience.
Many modern PTZ cameras even have intelligent features like auto-framing or speaker tracking, which uses the room's microphones to automatically find and focus on whoever is talking. It’s like having a dedicated camera operator without the extra headcount.
Audio: The Most Critical Component
Think about it: you can tolerate a slightly fuzzy video feed, but if the audio is garbled, echoing, or cutting out, the meeting is over. Communication stops cold. This is the one area where you absolutely should not cut corners.
Here’s a simple way to think about audio solutions:
- Huddle Rooms: An all-in-one video bar is perfect here. It packs a camera, mics, and speakers into a single unit that mounts cleanly above or below your display. Simple and effective.
- Mid-Sized Rooms: A high-end video bar can still work, but you might want to look at systems that include one or two satellite microphone pods for the table. This helps ensure everyone is heard equally, not just the people closest to the screen.
- Large Boardrooms: Forget off-the-shelf solutions. You need a professionally designed system with multiple ceiling microphones, in-ceiling speakers, and a dedicated digital signal processor (DSP) to handle echo cancellation and mix everything perfectly.
Don't forget that a great meeting experience goes beyond the tech on the wall. The comfort of your team matters, too. For long sessions, ergonomic furniture like our sit-stand desks can make a huge difference in keeping people focused and comfortable.
To help you visualize the right gear for your space, here's a quick guide matching typical room sizes with our recommended AV components.
AV Component Selection Guide by Room Size
| Room Type | Display Recommendation | Camera Type | Microphone Solution |
|---|---|---|---|
| Huddle Room (2-4 ppl) | 55"-65" Commercial 4K Display | All-in-one Video Bar w/ Wide FOV | Integrated Mics in Video Bar |
| Mid-Sized (5-10 ppl) | 75"-86" Commercial 4K Display | PTZ Camera or High-End Video Bar | Video Bar or Tabletop Mic Pods |
| Large Boardroom (10+) | 98"+ Display or Laser Projector | Multiple PTZ Cameras | Ceiling Mics & Speakers w/ Dedicated DSP |
This table should give you a strong starting point for budgeting and planning, ensuring you don't over-spec a small room or under-equip a large one.
The Rise of All-In-One Video Bars
For a huge number of small and mid-sized rooms, the video bar has become the go-to solution, and for good reason. They drastically simplify both the installation and the day-to-day management of a conference room.
Where they shine:
- Simplicity: It’s one box. One thing to mount, one power cord, one USB cable. It doesn't get easier.
- Cost-Effectiveness: Buying one integrated unit is almost always cheaper than buying a separate camera, speaker, and microphone array.
- Consistency: If you have 20 huddle rooms, using the same video bar in all of them creates a familiar, easy-to-use experience for your team.
When a separate component system is better:
- Large or Tricky Rooms: For rooms with weird acoustics, glass walls, or an unusual shape, you need the flexibility to place mics and speakers in very specific spots. A video bar just can't do that.
- Future Upgrades: With separate components, you can upgrade just the camera in a few years when 8K becomes standard. With a video bar, you have to rip out and replace the entire thing.
Choosing the right components is all about matching the tech to the room's purpose. By thinking through your display, camera, and especially your audio needs, you can put together a conference room system that just works.
Mastering the AV Installation Process
Alright, you've got your plan and a pile of shiny new gear. Now for the fun part: bringing it all to life. This is where the rubber meets the road, and a methodical, hands-on approach is what separates a professional, reliable conference room av setup from a tangled mess of future service calls. Trust me, paying close attention to the details now will save you a world of headaches later.
The real difference between an amateur job and a pro install often boils down to the physical work. Proper mounting, smart device placement, and clean cable management aren't just for looks—they're critical for performance, safety, and the lifespan of your system. This is where you make sure that investment pays off.

Mounting Displays and Cameras for Optimal Performance
The first thing anyone will notice is the screen and camera, so let's get their placement right. If you mess this up, you're setting the stage for user discomfort and a lousy meeting experience for everyone dialing in.
For your display, the sweet spot is usually mounting it so the center of the screen is at eye level for a seated person. You also have to be absolutely sure the wall mount you're using is rated for the specific weight and size of your display. I've seen people use flimsy consumer-grade mounts for heavy commercial screens, and that's a huge safety risk you don't want to take. If you're looking for the right hardware, browsing a professional collection of monitor mounts is a good place to start, as they're built for various weights and VESA patterns.
Camera placement is a different kind of challenge. You want that camera as close to the display's centerline as you can get, either just above or directly below it. This creates a more natural line of sight, which helps remote participants feel like you're actually making eye contact with them.
A well-placed camera captures more than just faces; it captures body language. By positioning it to see everyone from the waist up, you create a much more engaging and personal connection. It makes remote attendees feel like they’re truly in the room and part of the conversation.
Strategic Placement of Microphones and Speakers
Nothing kills a meeting faster than bad audio. Even the most expensive equipment will sound awful if it's in the wrong spot, so where you put your mics and speakers is everything.
Steer clear of these common audio traps:
- HVAC Vents: Never, ever place a microphone near an air conditioning vent. The constant airflow creates a low-frequency rumble that you'll never get rid of.
- Projector Fans: The same rule applies to noisy projector exhaust fans. Keep mics far away.
- Reflective Surfaces: Mics placed too close to glass walls or large, empty tables will pick up nasty echoes and make everything sound hollow.
When it comes to speakers, your goal is to spread the sound evenly across the room. In a smaller huddle space, the speakers built into a good video bar or the display itself might be enough. For bigger rooms, ceiling speakers are the way to go. They ensure everyone can hear clearly without blasting the people sitting closest to the screen.
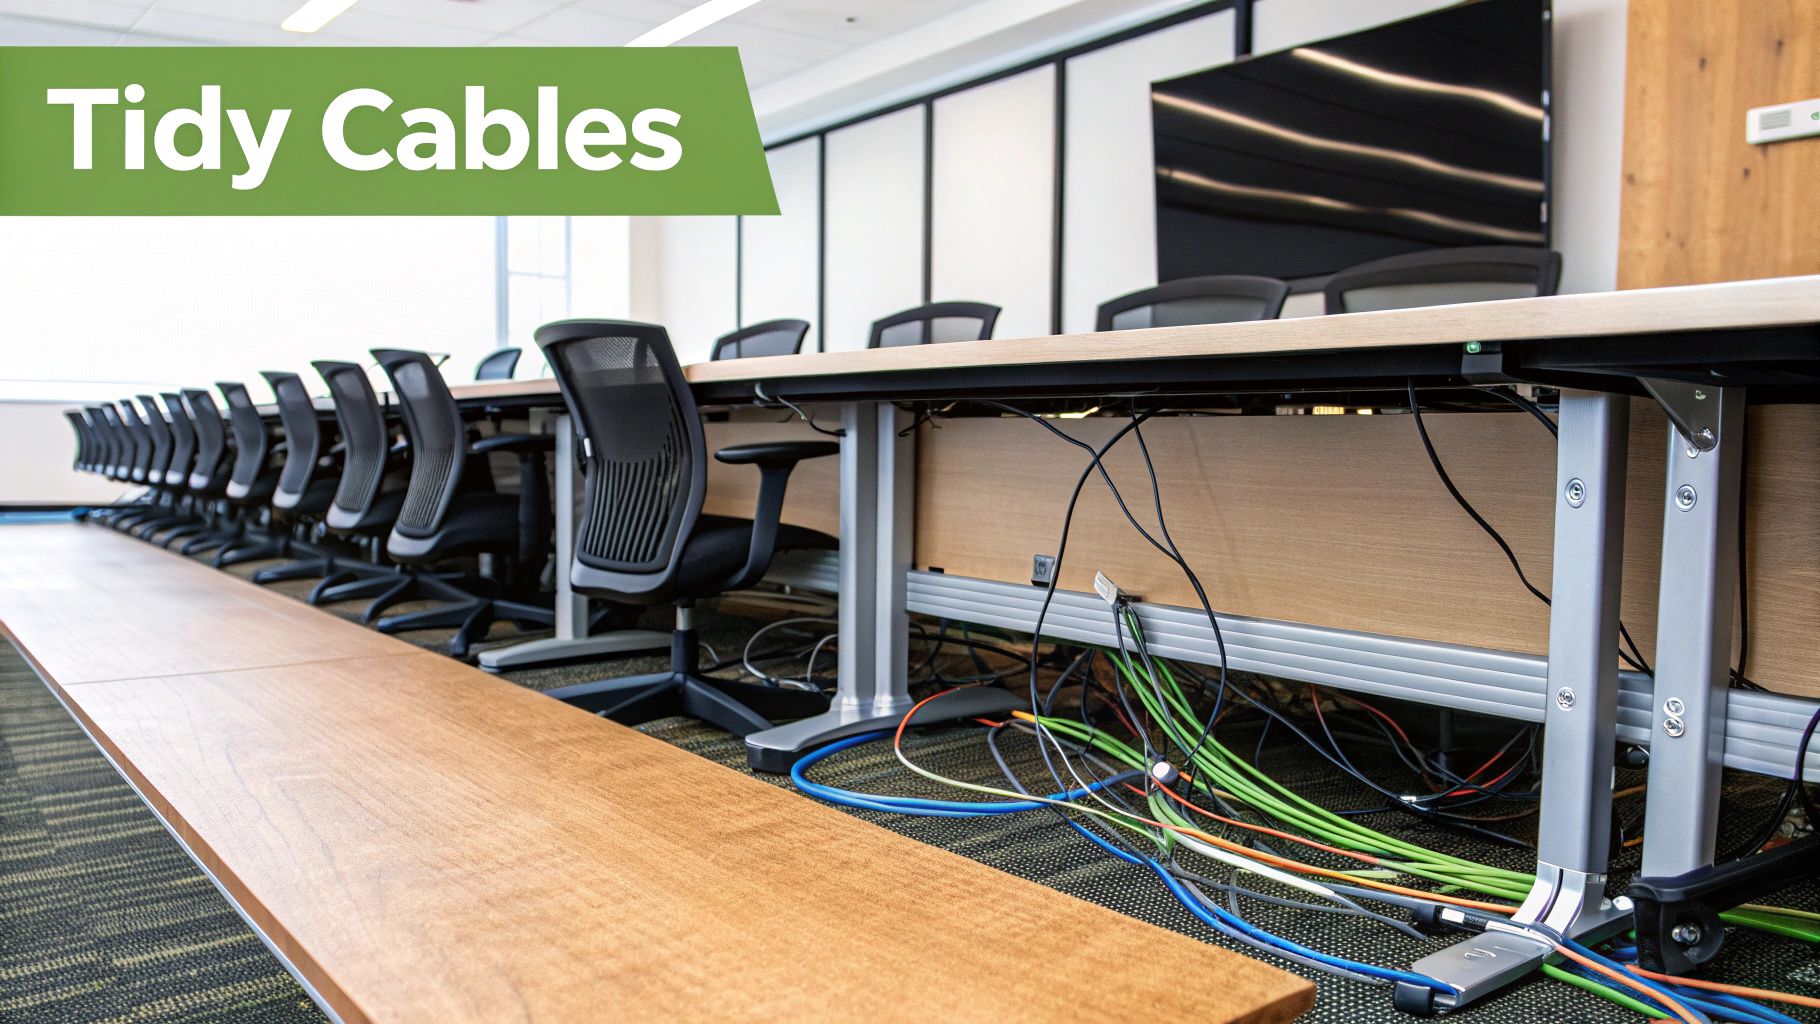
The Art of Professional Cable Management
Let's be honest: messy cables look terrible, but they're also a ticking time bomb. A rat's nest of wires behind a TV or in an equipment rack is a troubleshooter's worst nightmare and just invites accidental disconnections. Clean cable management is a true sign of a quality installation.
Before you run a single wire, plan your routes. Use conduits or raceways to hide cables in walls and ceilings for that clean, finished look. Inside the AV rack itself, every cable should be neatly routed, secured with Velcro ties (please, no zip ties—they can damage cables), and clearly labeled on both ends.
Taking the time to do this right pays off in a few big ways:
- Easier Troubleshooting: When something goes wrong, labeled cables mean you can trace connections in seconds instead of guessing.
- Improved Airflow: Organized cables in a rack prevent hot spots, which helps your expensive components live a lot longer.
- Enhanced Reliability: Secured connections don't just work themselves loose over time or get snagged when someone is doing routine maintenance.
This is the meticulous, behind-the-scenes work that makes sure your system isn't just working on day one, but stays stable and easy to service for years.
Configuring and Testing Your New System
You’ve done the hard work of getting all the hardware installed. Now it’s time to bring it all to life. This is the final, and frankly, most critical phase of your conference room AV setup. We're moving beyond just plugging things in; this is where a collection of expensive components becomes a single, cohesive system that anyone on your team can actually use.
This part of the process is all about software configuration, device integration, and—most importantly—relentless, real-world testing. This is what separates a frustrating, glitchy room from one that just works.
A system that looks impressive but is a pain to operate is a failure, plain and simple. The goal here is to make sure every button press and screen tap does exactly what it's supposed to do, turning what could be a complex tangle of tech into an effortless tool for collaboration.
Initial Software and Network Configuration
First things first: every device needs to shake hands with your network. This means getting your video conferencing codec, control panel, and any other smart devices connected. You'll want to loop in your IT department here to make sure everything lands on the correct VLAN and gets the permissions it needs to function without opening up security holes.
With everything online, the next step is integrating the system with your company's collaboration platform, whether that's Microsoft Teams Rooms or Zoom Rooms. This usually involves logging into your corporate account on the room's main device and making sure its calendar is synced up correctly. This small step is what enables those one-touch-join features that can shave minutes off the start of every meeting.
This is a fast-growing space. The global conference room AV system market is on track to hit around $308 million, growing at a steady 6.4% annually through 2033, largely because of the massive shift to hybrid work.
A Comprehensive Testing Checklist
A quick "does it turn on?" check is nowhere near good enough. You need to put the system through its paces by simulating how your team will actually use it—and even misuse it. Forget a simple check; create a detailed script that covers every likely scenario.
A system isn't truly "finished" until a non-technical user can walk in, start a complex video call, share their screen, and end the meeting without a single moment of confusion. The ultimate test is user intuition.
Use this checklist as a starting point for your own rigorous testing process:
- Audio Verification: Make test calls and have someone walk around the room, speaking in a normal voice. Make sure they sit in every chair, especially the ones tucked into corners, to confirm their voice is picked up clearly without any weird echoes or dropouts.
- Video and Camera Presets: Check the camera's focus, color, and brightness in your room's actual lighting conditions. If you have a PTZ (pan-tilt-zoom) camera, program presets for key spots—the presenter's lectern, the whiteboard, and a wide shot of the whole table. Test each one to ensure the transitions are smooth, not jarring.
- Content Sharing: This is where things often fall apart. Try sharing content from every possible source: the dedicated room PC, a guest laptop plugged in via HDMI, and wirelessly from both a PC and a Mac.
- Control Panel Usability: This is the real test. Hand the control panel to someone who has never seen it before. Without any instructions, can they figure out how to start a meeting, adjust the volume, and switch video sources? Their feedback is gold.
For a deeper dive into the components that make up these systems, check out our extensive collection of professional audio and video gear. By meticulously configuring and testing every last function, you ensure your new conference room becomes a powerful asset instead of a recurring source of technical support tickets.
Got Questions About Your Conference Room AV?
Even with the most solid plan, questions are bound to pop up during an AV installation. Getting ahead of these common queries can save you a ton of time and stop minor hiccups from turning into full-blown headaches. Let's dig into some of the things people ask us most often.
One of the biggest concerns is always future-proofing. How do you pick gear that won't feel like a dinosaur in two years? The trick is to lean into equipment built on open standards. Look for displays that support today's resolutions and have a clear path to what's next, and choose systems that can be upgraded with software to unlock new features down the road.
Another major one is user adoption. What happens if the team thinks the new system is just too complicated to use? The answer here is a one-two punch: simplicity and training. Pick a system with a dead-simple interface—think one-touch-join panels—and then run a few quick, hands-on training sessions to get everyone comfortable.
The real test of a great AV setup isn't the spec sheet. It's how smoothly it disappears into your team's day-to-day work. If it's easy to use, people will actually use it.
Troubleshooting Common Issues
Sooner or later, you’ll hit a snag. It happens. Here are some quick fixes for the usual suspects.
What's the best way to handle audio echo? Echo is almost always a room acoustics problem. Before you start blaming the mics, take a look around. Are there a lot of hard, reflective surfaces like glass walls or a bare conference table? Adding a few acoustic panels or even just a rug can work wonders by absorbing sound and killing that distracting echo.
Why does the video look grainy or lag? Nine times out of ten, this is a network issue, not a camera problem. High-quality video conferencing eats up a lot of bandwidth. You need to make sure the room's internet connection is stable and has plenty of juice, especially if you're aiming for 4K streaming. A hardwired ethernet connection will always beat Wi-Fi for reliability here.
Can we just use our existing consumer-grade TV? You can, but it's really not a great idea for a professional space. Commercial displays are built differently. They're designed for much longer hours of daily use, often have better warranties, and include business-friendly features like anti-glare screens. In fact, using a consumer TV in a commercial setting can sometimes void its warranty entirely.
Of course, these are just a few common scenarios, and every room has its own unique quirks. For a deeper dive into technical questions, you can always check out our comprehensive AV setup FAQ page.
At Mount-It, our goal is to help you create workspaces where people can be both productive and comfortable. Our smart, simple solutions—from ergonomic furniture to professional AV mounts—are designed to help your team do their best work. See how we can elevate your meeting spaces by exploring our full range of products at https://www.mount-it.com.