
A great ceiling mount projector installation really starts long before you ever pick up a drill. The secret sauce is all in the prep work—getting the right hardware in hand and gathering every tool you'll need ahead of time. This kind of planning is what separates a frustrating afternoon from a secure, professional-looking home theater setup.
Your Pre-Installation Game Plan
A perfect installation comes down to the choices you make right at the beginning. If you rush this part, you're setting yourself up for headaches like a misaligned picture, a wobbly mount, or that dreaded mid-project run to the hardware store. Think of this as your pre-flight check, making sure every single piece is right for your projector and your room.
This careful approach is becoming the norm as home theaters pop up in more and more houses. The global market for projector ceiling mounts was recently valued at around USD 1.2 billion and is expected to hit nearly USD 1.8 billion by 2033, all thanks to the growing demand for clean, space-saving AV setups.
Choosing the Right Ceiling Mount
Your first big decision is the mount itself. You’ll generally run into two main kinds: universal and model-specific. Explore our full collection of projector mounts to see the different options available.
Universal mounts are the flexible option, designed with adjustable arms to fit the mounting hole patterns on a wide range of projector brands. Model-specific mounts, on the other hand, are built for one particular projector. They guarantee a perfect fit but give you zero flexibility if you decide to upgrade your projector down the road.
Beyond just fitting your projector, you need to think about a few other critical things:
- Weight Capacity: This is non-negotiable. Always pick a mount rated to hold at least double your projector's weight. That safety margin is essential.
- Adjustability: Look for features like tilt, swivel, and roll. These are your best friends for getting the image lined up perfectly with the screen. Mounts with micro-adjustment knobs are a huge bonus for that final fine-tuning.
- Extension Length: Make sure the mount’s extension column is long enough to drop the projector to the ideal height for your screen.
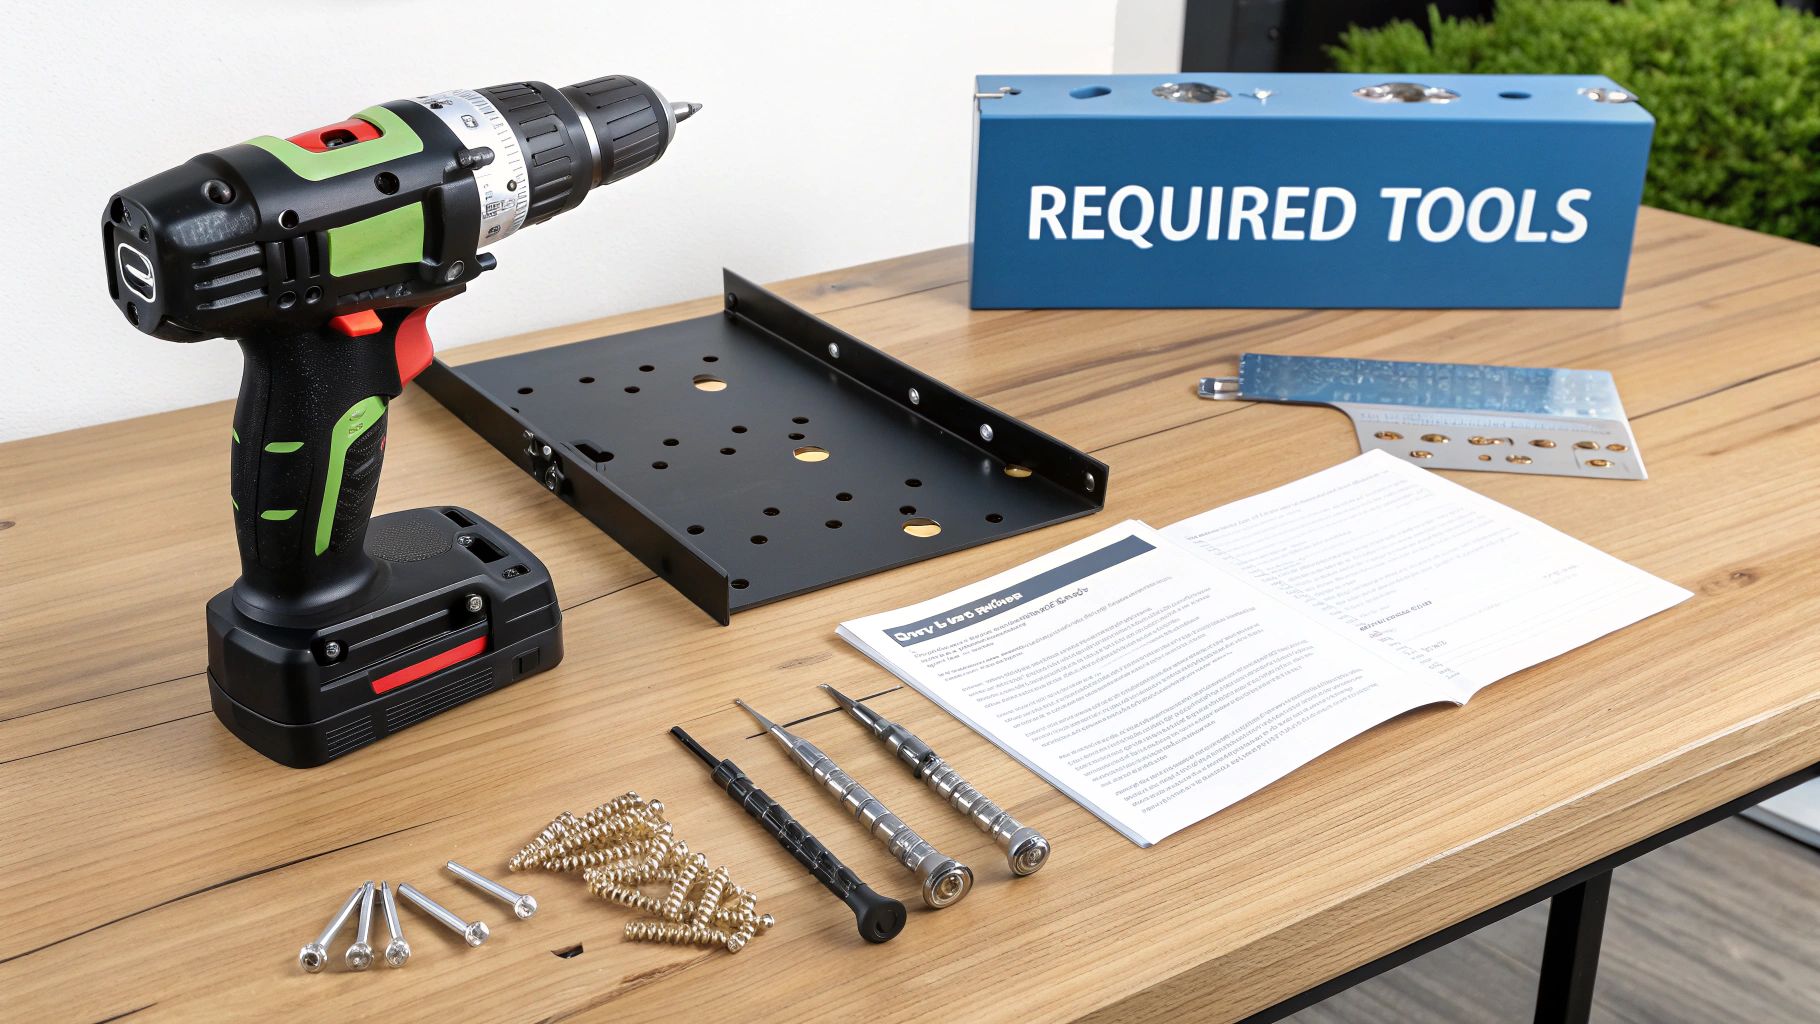
Assembling Your Installation Toolkit
Having the right tools ready to go can turn a potentially difficult job into a smooth, satisfying project. A lot of people think all they need is a drill, but securing a heavy piece of electronics to your ceiling requires a bit more precision than that. You need the right gear to make sure it stays up there for good.
Before you start, here's a quick look at the tools and materials that will make your life a whole lot easier.
| Tool/Material | Primary Use | Pro Tip |
|---|---|---|
| Stud Finder | Locating ceiling joists for a secure anchor | A good electronic stud finder is worth its weight in gold. Slide it across the ceiling slowly for the most accurate reading. |
| Power Drill | Drilling pilot holes and driving screws | Use a drill with a clutch setting to avoid over-tightening and stripping the screws. |
| Drill Bit Set | Creating holes for screws and anchors | Have both wood and masonry bits on hand, just in case you run into unexpected materials. |
| Socket Wrench Set | Tightening the bolts that secure the mount | Much easier and more effective than trying to use pliers or an adjustable wrench. |
| Level | Ensuring the mount is perfectly horizontal | A small torpedo level is perfect for this job. For extra precision, you can use a laser level. |
| Measuring Tape | Finding the center of the screen and ceiling | Measure twice, drill once! Double-check all your measurements before making any holes. |
| Fish Tape | Routing cables through the ceiling or walls | This flexible wire is a lifesaver for hiding HDMI and power cords for a clean, professional look. |
| Pencil | Marking drilling locations on the ceiling | Use a pencil that’s easy to erase so you don’t leave permanent marks. |
With these essentials at the ready, you’re setting yourself up for a much smoother installation process from start to finish.
The single most dangerous mistake you can make is failing to anchor the mount directly into a ceiling joist. Drywall alone will not hold the weight and vibrations over time. Always, always find a joist.
A stud finder is your best tool for locating those crucial ceiling joists, which is the only truly secure way to anchor the mount. If a joist isn't perfectly centered where you need it, you might have to install some wood blocking in the attic.
If mounting to a joist just isn't an option, you'll need to know how to find the best drywall anchors, but keep in mind that this is a last resort and direct-to-joist mounting is always the safest bet.
Once you’ve gathered your drill, bits, socket wrench, level, and measuring tape, you’re ready to roll. With the right mount chosen and your toolkit complete, your projector installation is already on the path to success.
Finding the Sweet Spot for Your Projector and Screen
The entire success of your home theater really boils down to geometry. Before you even think about drilling a single hole, the most critical part of a ceiling mount projector installation is figuring out the perfect placement for both the projector and the screen. This one decision impacts everything from image size and clarity to how immersive the whole experience feels.
It all begins with a term called throw distance—that’s simply the distance from your projector’s lens to the screen surface. Every projector has a "throw ratio" in its manual, which is the key to unlocking its potential. For example, a projector with a 1.5:1 throw ratio creates an image 1 foot wide for every 1.5 feet you move it back from the screen.
So, to find your ideal mounting spot, start by deciding how big you want your screen to be. Once you have that figured out, the throw ratio will tell you exactly how far back the projector needs to be mounted. Doing this quick bit of math upfront ensures the image fits your screen perfectly without relying on digital tricks that can hurt picture quality.
Navigating Physical and Digital Adjustments
Okay, you've calculated the perfect throw distance. Now it's time to look up at the ceiling. Is there a light fixture or a ceiling fan exactly where you need to mount? It happens all the time. This is where a feature called lens shift becomes your absolute best friend.
Lens shift lets you move the projected image up, down, left, or right without physically moving the projector itself. Crucially, it's an optical adjustment, meaning it doesn't degrade or distort the image resolution one bit.
Here’s the difference:
- Lens Shift (Optical): This is the gold standard. The feature physically moves the lens inside the projector, keeping your image perfectly sharp and rectangular. Always use this first.
- Keystone Correction (Digital): Think of this as a last resort. It digitally squishes the image to fix that trapezoid shape, but it does so by compressing pixels. The result is a noticeable loss in sharpness and potential for weird visual artifacts.
Relying on digital keystone correction is one of the most common mistakes people make. It sacrifices the pristine image quality you paid for. Always prioritize using lens shift to get the alignment just right.
Securing the Foundation and Optimizing the View
With your location pinpointed, the next job is to find a ceiling joist. A projector, even a lightweight model, is far too heavy to be supported by drywall alone. Grab a stud finder and locate a solid wood joist right above your target mounting spot. This will give you a rock-solid anchor you can trust.
Finally, think about the view from your favorite chair. The screen height should be comfortable, not something that gives you a neck cramp after 30 minutes. A good rule of thumb is to position the screen so the bottom third is at eye level when you’re seated. Many of the same ergonomic principles apply here as they do for TVs, and you can get more details in our optimal TV height guide to transform your viewing experience.
Don't forget about ambient light from windows and lamps, either. Even a little bit of light can wash out a projector's image, making blacks look gray. Consider blackout curtains or just being mindful of placement to fight light pollution and get those deep, cinematic blacks you're after.
A Practical Guide to the Mounting Process
Alright, you've done the math and finished your planning. Now for the fun part: actually getting your projector up on the ceiling. This is where all that careful preparation really starts to shine, turning your plan into a real-life home theater setup. The whole process breaks down into a few key stages that, if you follow them closely, will give you a rock-solid and perfectly aimed projector.
That image below? It highlights the very first, and most critical, part of the job—picking the spot. It seems simple, but getting this right is the foundation for everything that follows.
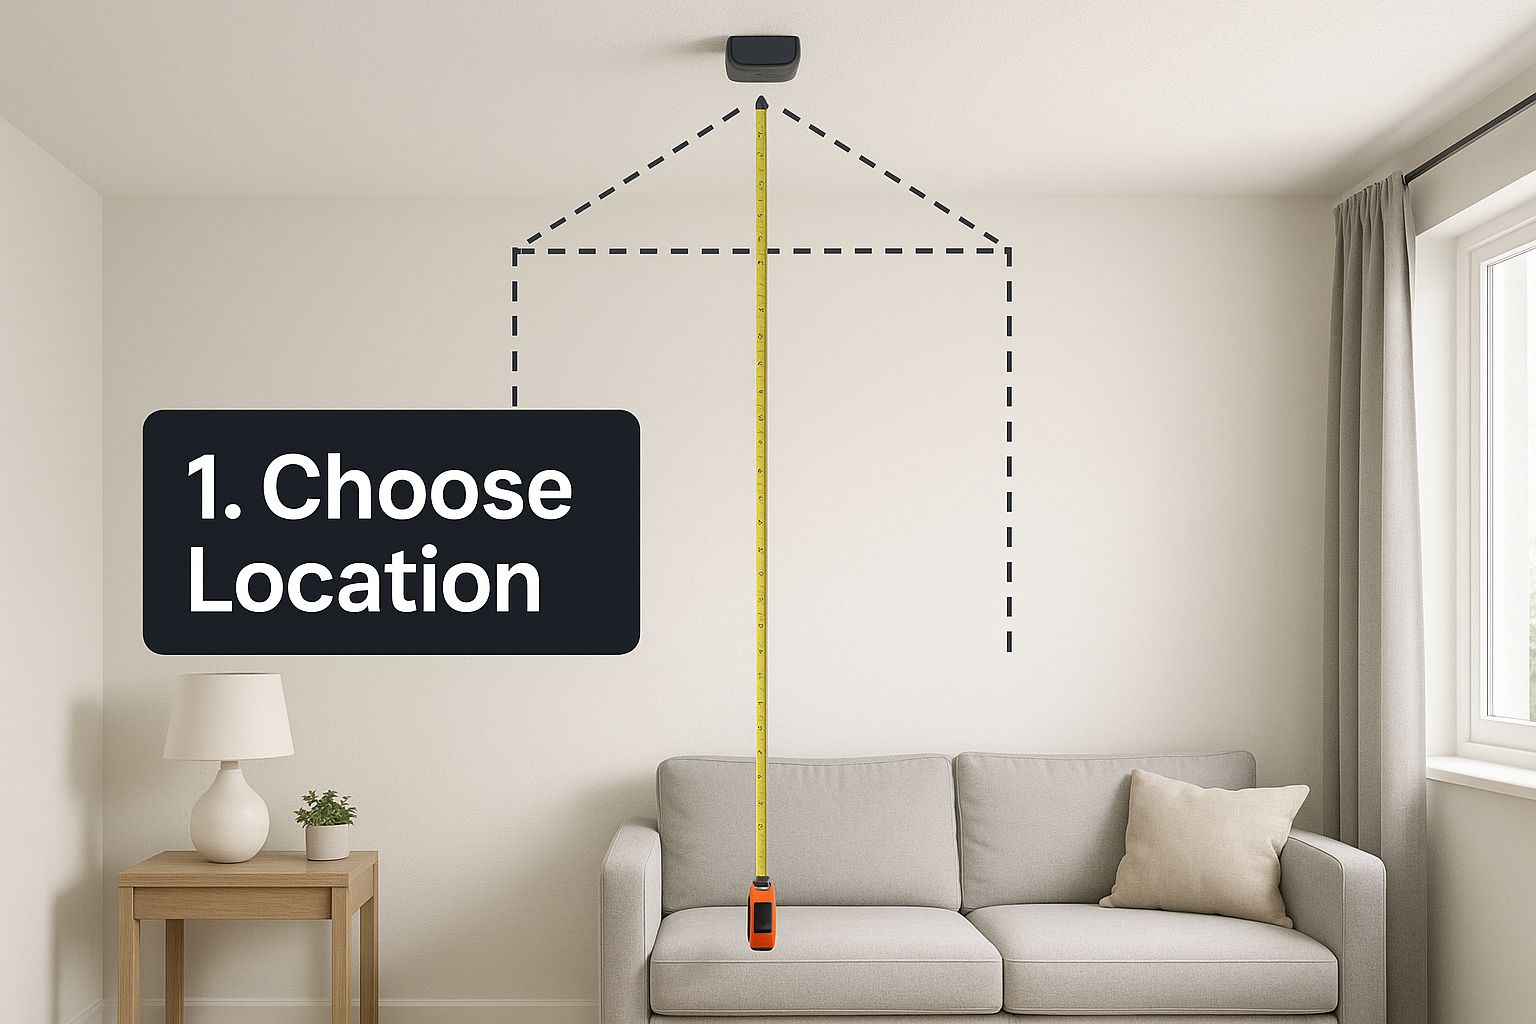
With your location confirmed by those earlier measurements, you’re ready to make it official and start the installation.
Securing the Ceiling Plate
First things first, you need to install the ceiling plate. Think of this as the anchor for your entire rig. Double-check your marked location one last time, making sure you’re centered directly over a ceiling joist. Now, drill your pilot holes. Don't skip this—these small holes are crucial for preventing the wood joist from splitting when you drive in the big lag bolts. It also makes screwing them in a whole lot easier.
The hardware you use is everything, and it’s dictated by what your ceiling is made of.
- Wood Joists: Stick with the lag bolts that came with your mount. They’re designed to grip the wood for a super secure hold.
- Concrete Ceilings: This is a different beast. You'll need a masonry drill bit and some specialized concrete anchors or sleeves to get the job done safely.
- Drywall (Not Recommended): I can't stress this enough—avoid this if you can. But if you have absolutely no other choice, you must use heavy-duty toggle bolts rated well above the combined weight of your projector and mount.
Attaching the Bracket and Assembling the Mount
With the ceiling plate firmly anchored, it's time to prep the projector itself. Lay it upside down on something soft—a towel or blanket works perfectly—to protect the lens from scratches. Now, attach the mounting arms to the threaded screw holes on the projector’s base. You’re aiming for a balanced fit, so when you gently lift it by the bracket, it feels stable and centered.
The next part is usually the trickiest: connecting the projector (with its bracket) to the extension column and then hoisting the whole assembly up to the ceiling plate. It’s awkward, and you’ll need a steady hand.
Safety First: Please, get a friend to help you lift and attach the projector to the ceiling mount. Trying to wrestle with a heavy piece of electronics while teetering on a ladder is a classic recipe for disaster. You could wreck your new gear or, worse, hurt yourself.
More and more people are putting in the effort for dedicated media rooms, which is why we're seeing this market grow. In fact, the overall projector mounts market is projected to expand at a CAGR of 7.8% from 2025 to 2031. It’s a clear sign that home and commercial setups are getting more sophisticated.
Once the projector is connected to the plate, just loosely tighten the bolts for now. This gives you some wiggle room to make those first big adjustments—getting it level and pointed in the general direction of the screen—before you lock it all down. For a more granular look at this process, check out our complete DIY guide on how to mount a projector. It'll walk you through all the finer points to make sure your setup is perfect.
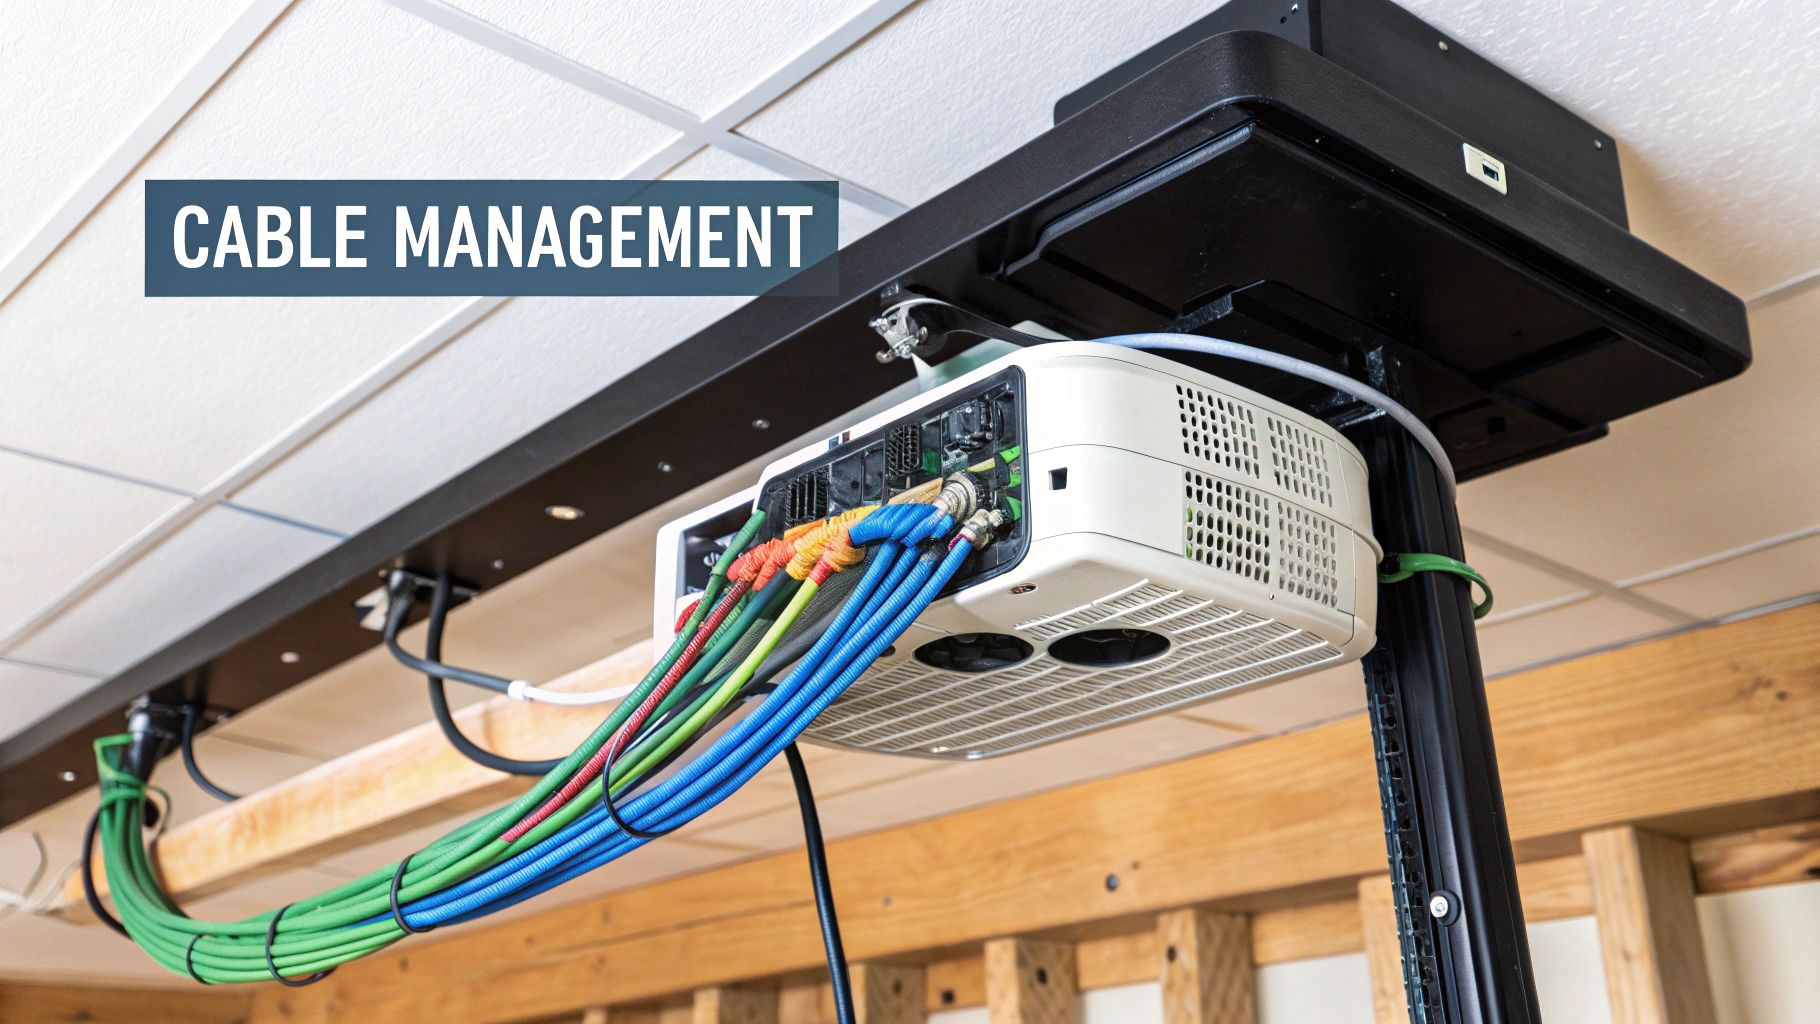
Achieving a Clean Look with Smart Cable Management
You know what separates a good ceiling mount projector installation from a great one? The details you don't see. A jumble of HDMI and power cords dangling from the ceiling can completely ruin the vibe, turning your slick home theater into a tech-cluttered mess.
Getting those cables under control is the final, professional touch that really makes the whole project shine.
How you tackle this depends on your budget, your DIY skills, and just how invisible you want those wires to be. For a quick and relatively painless solution, you can grab a surface-mounted raceway. It's essentially a plastic channel that sticks to your ceiling and walls, giving you a clean track to tuck the cables into.
But if you’re after that truly seamless, "how did they do that?" finish, running the cables inside the ceiling and walls is the way to go. It makes the wires completely disappear.
Routing Cables for an Invisible Finish
Going for the invisible look takes a bit more elbow grease, but trust me, the payoff is huge. The idea is to "fish" the cables through the empty space in your ceiling and down an interior wall, right to your AV receiver or power outlet.
Your best friend for this job is going to be a fish tape. It’s a long, flexible wire (usually steel or fiberglass) designed specifically for pulling cables through those tight, hidden spaces you can't see or reach.
Here’s the basic game plan:
- Make Your Openings: You’ll need to cut two small holes—one in the ceiling right near the projector mount, and another in the wall behind your entertainment center. A simple drywall saw is all you need to make clean openings for some low-voltage wall plates.
- Go Fish: Push the fish tape into the ceiling hole and aim it toward the opening in the wall. Once the end pops out, securely tape your HDMI and other cables to it. Then, just head back to the ceiling and gently pull everything through.
- Add the Finishing Touches: Finish it off by installing brush-style wall plates over the openings. They give your cables a clean, professional-looking exit point and cover up the rough drywall edges.
One thing you absolutely can't skip: if you're running cables inside a wall, you must use in-wall rated (CL2 or CL3) cables. This isn't just a friendly suggestion; it's a critical safety requirement. These cables have a special fire-resistant jacket that meets building codes and is designed to prevent fire from spreading inside your walls.
Cable Management Method Comparison
Choosing the right method comes down to a trade-off between difficulty, cost, and the final look. Here’s a quick comparison to help you decide what’s best for your setup.
| Method | Difficulty Level | Average Cost | Aesthetic Result |
|---|---|---|---|
| In-Wall/Ceiling | Moderate to High | $50 - $150 | Completely Invisible |
| Surface Raceway | Low | $20 - $50 | Clean & Organized |
| Cable Sleeve | Very Low | $10 - $30 | Tidy & Bundled |
While running cables in the wall gives you that perfect, professional finish, don't discount raceways. Modern versions are sleek and can even be painted to match your wall color, making them a fantastic and easy alternative.
Choosing the Right Cables
Finally, remember that the quality of your cables directly affects your picture quality. If you're running a modern 4K projector, don't skimp here. You'll need a High-Speed or even Ultra High-Speed HDMI cable to handle the massive amount of data required for crisp, high-resolution video and immersive audio formats.
Looking for more inspiration? We've put together a ton of different approaches in our comprehensive guide on cable management ideas that you can use throughout your entire home theater. Putting in that extra effort on your cables is what will make you proud of your setup every time you turn it on.
Calibrating Your Projector for Perfect Picture Quality
Now for the fun part. Your projector is mounted, and it’s time to dial in that perfect, movie-theater-quality picture. This is where a little patience pays off big time, transforming a decent image into a truly stunning one. We'll start with the physical adjustments first—getting the image squared up on your screen is half the battle.
Before you even think about touching the remote, get back on your ladder and slightly loosen the adjustment bolts on your mount. From here, you can physically adjust the tilt (the up-and-down angle), swivel (side-to-side), and roll (leveling). Your goal is to get the projected image as centered and rectangular as you possibly can, just by moving the projector itself. Trust me, doing this hands-on work now is the secret to preserving the best possible image quality down the line.
This level of detail is exactly why the market for ceiling-mounted projectors is booming, currently valued around USD 3.2 billion and projected to hit USD 5.9 billion by 2032. People want that immersive experience, and a stable, perfectly aligned mount is non-negotiable. If you want to dive deeper, you can check out more ceiling mounted projector market trends on dataintelo.com.
Fine-Tuning with On-Screen Settings
Once the projector is physically aligned as well as it can be, power it on and grab the remote. Now we can use the projector’s own settings to finish the job. The key is to use the least destructive tools first.
Start with the focus. Use the focus ring on the lens or the remote control function to make the image as sharp as possible. I find it helpful to pull up a test pattern with text or a fine grid—this makes it easy to see when you’ve nailed that edge-to-edge clarity.
Next up is lens shift, if your projector has it. This is a game-changing feature that lets you move the entire image up, down, left, or right without physically moving the projector. Because it's a mechanical adjustment of the lens itself, it preserves 100% of the image resolution. If you have lens shift, always, always use it before any digital correction.
Keystone Correction: Use Only as a Last Resort It's incredibly tempting to just hit the keystone button to fix a crooked image. My advice? Don't do it unless you have absolutely no other choice. Keystone correction is a digital fix that squishes and stretches the image, which almost always results in a softer picture and can introduce weird digital artifacts.
Dialing in Color and Brightness
With the geometry perfect, it's time to adjust the picture itself. Most projectors have picture modes like "Cinema" or "Movie," which are fantastic starting points. Select one, and then you can tweak the core settings to match your room's lighting.
- Brightness: This setting actually controls your black levels. You're looking for deep, true blacks, not a murky gray. Lower the brightness until the dark areas are rich, but be careful not to crush the details out of the shadows.
- Contrast: This is for your white levels. A higher contrast gives you a punchy, vibrant image. Push it up, but stop before you start losing detail in the brightest parts of the picture (what we call "clipping" the whites).
- Color and Tint: This is more subjective, but the goal is always natural-looking skin tones. If people look sunburnt or sickly, you'll need to make small adjustments here until everything looks right to your eye.
By taking a methodical approach—from big physical moves to tiny digital tweaks—you’ll end up with a perfectly calibrated picture that makes your home theater feel like the real deal.
Answering Your Top Projector Installation Questions
Even the most carefully planned installation can hit a snag. A few common questions always seem to pop up right in the middle of a project, so let's tackle them head-on.
Getting these details sorted out beforehand is the key to avoiding frustration and making sure your new home theater setup looks and works like a pro did it.
Can I Mount a Projector on a Slanted or Vaulted Ceiling?
You absolutely can, but you'll need the right gear for the job. A standard mount just won't cut it. For angled ceilings, you have to use a vaulted ceiling mount adapter or a mount built specifically for this purpose. These have a special pivot right at the ceiling plate that lets the extension pole hang perfectly vertical, no matter how steep your ceiling's pitch is.
Don't even think about trying to force a standard flat-ceiling mount to work here—it's a huge safety hazard. It will never be secure, and you'll be stuck with a skewed picture that no amount of digital correction can fix. Make sure any mount you buy is explicitly rated for your ceiling's angle.
How Do I Figure Out the Right Screen Size?
Finding the perfect screen size is all about balancing your room’s layout with what your projector can do. The magic number you need is the throw ratio, which you’ll find in your projector’s spec sheet or manual. This ratio tells you exactly how big of an image the projector can create from a certain distance.
A simple way to start is by measuring from your main couch to the screen wall. From there, you can use the throw ratio to calculate the screen sizes that are possible from that spot.
As a rule of thumb for that immersive, movie-theater feeling, your main seating spot should be about 1.5 times the screen's diagonal measurement. So, for a big 100-inch screen, you'd want to be sitting around 12.5 feet away.
What Is the Most Common Installation Mistake to Avoid?
This one is easy, and it’s the most critical safety tip of all: failing to anchor the mount directly into a ceiling joist. It’s incredibly tempting to just use drywall anchors, but they are not designed to handle the weight and vibrations of a projector. Over time, they will fail, and your projector will come crashing down.
Always, always use a stud finder to pinpoint a solid wood joist. Then, drive the heavy-duty lag bolts that came with your mount directly into the center of it. If a joist isn't located exactly where you need the projector, the proper solution is to install wood blocking between two joists (this usually requires attic access). This gives you a rock-solid anchor point right where you need it. This is non-negotiable for keeping your expensive gear securely attached to the ceiling.
At Mount-It, we believe in providing smart, simple solutions to create the perfect viewing experience. Explore our full range of projector mounts and home theater accessories to find everything you need for a secure and professional installation.
Discover your ideal mounting solution at https://www.mount-it.com.