
Essential Tools and Smart Pre-Installation Planning
Installing a TV mount can appear deceptively simple. However, thorough pre-installation planning is essential for a smooth and successful experience. Just like constructing a building, a solid foundation is key. Rushing into the process without adequate preparation can lead to frustration and potentially costly errors. This guide provides the knowledge and foresight to avoid common pitfalls.
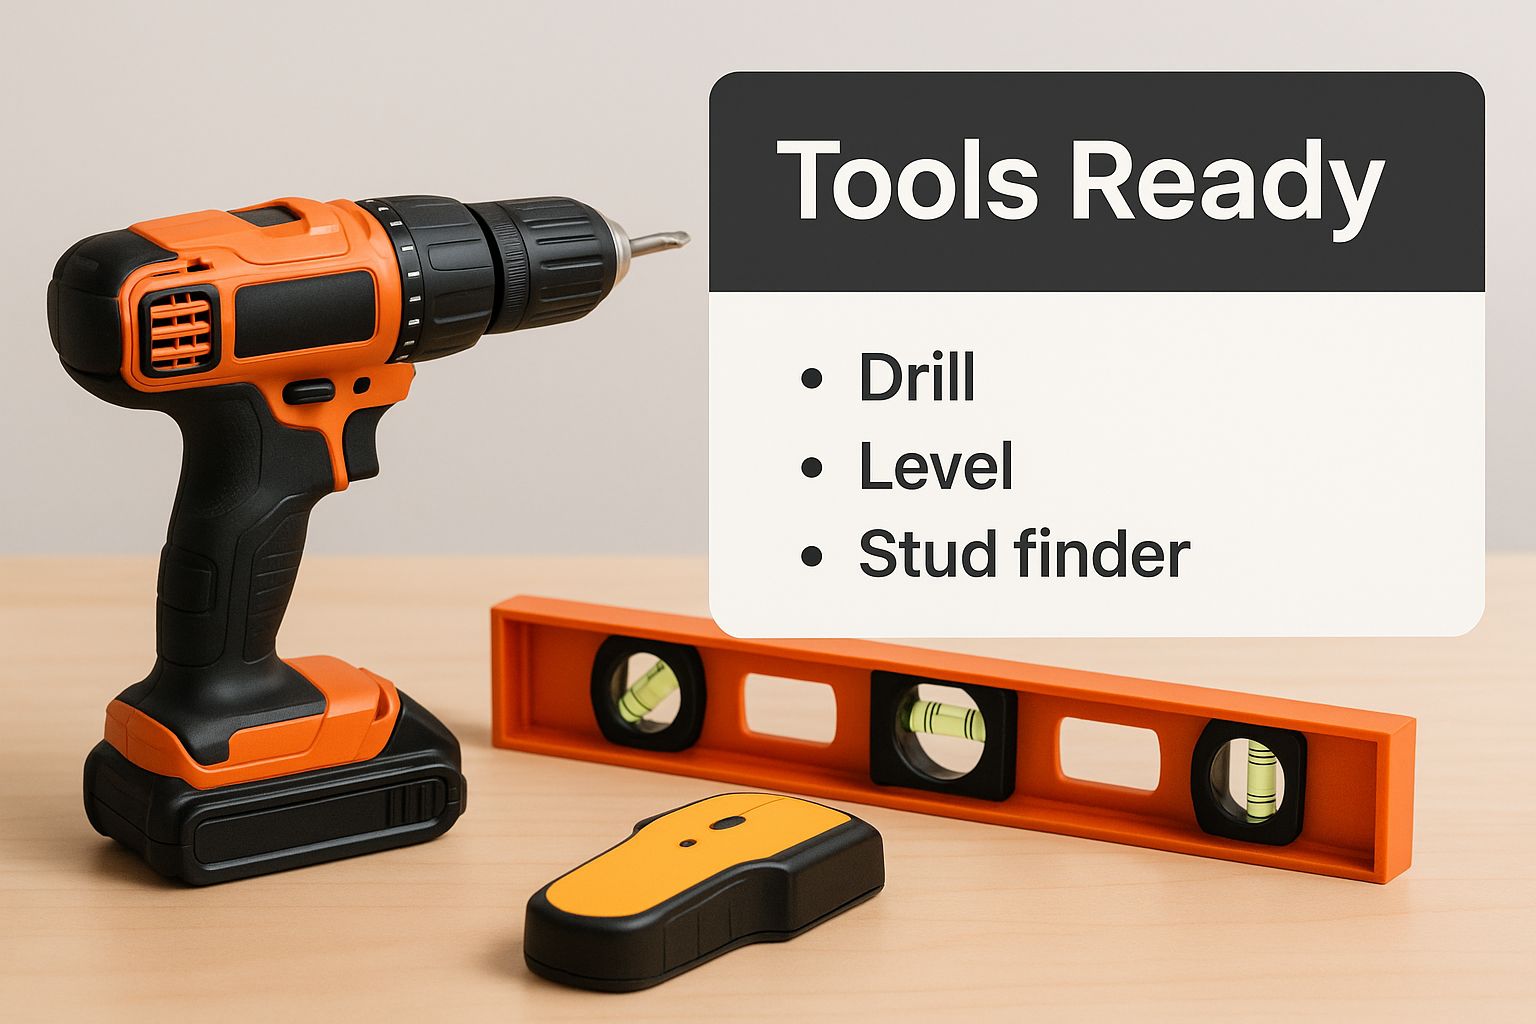
Gathering Your Toolkit
Having the correct tools readily available is the first step. It's not just about having any drill; it’s about having the right drill with the correct accessories. Different wall types require specific drill bits. Using an unsuitable bit on concrete is ineffective and potentially damaging.
- Stud Finder: Crucial for locating wall studs to ensure secure mounting.
- Level: Guarantees your TV hangs perfectly straight.
- Drill with appropriate bits: Select bits that match your wall type (wood, drywall, concrete, etc.).
- Screwdriver(s): Use the correct type and size for your mount's screws.
- Measuring Tape: Precise measurements are essential for proper placement and alignment.
- Pencil: Useful for marking drill points and other measurements.
- Safety Glasses and Gloves: Protect yourself from debris and sharp edges.
You might also be interested in: How to master your TV setup.
Planning for Success
Before you even begin the installation, take the time to carefully plan. This includes selecting the optimal mounting location, considering viewing angles, glare, and proximity to power outlets. Also, consider the overall aesthetic appeal. Treat your TV with the same care you would a prized possession.
- Check for Obstacles: Use a stud finder to locate studs and avoid drilling into pipes or wires.
- Measure Twice, Drill Once: Double-checking all measurements prevents misaligned holes.
- Weight Capacity: Verify that your chosen mount can safely support your TV's weight.
- Workspace Preparation: Clear the area around your installation site for safety and efficiency.
The growing trend of wall-mounted TVs is reflected in market data. The global TV wall mount market, valued at approximately $2 billion in 2025, is projected to reach between $3.5 billion and $5.8 billion by 2032-2033. Factors like larger screen sizes and minimalist design preferences contribute to this growth. More detailed statistics are available here: https://www.datainsightsmarket.com/reports/tv-wall-mounts-1356708
Pre-Installation Checklist
A simple checklist can help avoid overlooking critical details, ensuring a professional and safe installation. Similar to a pilot's pre-flight checklist, a pre-installation checklist can prevent costly mistakes.
- Tools Assembled: Confirm all necessary tools and hardware are available.
- Measurements Verified: Double-check the accuracy of all measurements.
- Mounting Location Finalized: Ensure the chosen location meets all requirements.
- Safety Precautions Taken: Remember to wear safety glasses and gloves for protection.
By following these pre-installation planning tips, you'll be well-equipped to install your TV mount confidently and achieve professional results. This preparation will simplify the installation process, allowing you to focus on the task without unexpected issues.
Choosing the Perfect TV Mount for Your Space
Selecting the right TV mount is crucial for an optimal viewing experience. A suitable mount enhances both the functionality and aesthetics of your home entertainment setup. There are various types of TV mounts, each with its own pros and cons. Understanding these differences will help you make a well-informed decision.
Types of TV Mounts
There are three main types of TV mounts to choose from:
-
Fixed Mounts: These mounts offer a sleek, flush appearance, positioning the TV close to the wall. They are typically the most budget-friendly and easiest to install. However, they don't offer any flexibility for adjusting the TV's angle. It’s much like hanging a framed picture.
-
Tilting Mounts: Tilting mounts provide a slight downward tilt, usually around 10-15 degrees. This helps reduce glare, especially if your TV is mounted higher on the wall. Think of it like adjusting a desk lamp to direct the light where you need it.
-
Full-Motion Mounts: These mounts offer the greatest flexibility. They allow you to swivel, tilt, and extend the TV. This is perfect for larger rooms with multiple viewing angles or if you frequently need to access the ports on the back of your TV. Learn more by exploring full-motion options.
To help you compare the different mount types, we've put together a handy comparison guide:
TV Mount Types Comparison Guide Compare fixed, tilting, and full-motion TV mounts across key factors like price, viewing flexibility, and installation complexity
| Mount Type | Price Range | Viewing Flexibility | Installation Difficulty | Best For |
|---|---|---|---|---|
| Fixed | $ | Low (no adjustment) | Easy | Small rooms, single viewing angle |
| Tilting | $$ | Moderate (tilt only) | Medium | Reducing glare, higher wall mounts |
| Full-Motion | $$$ | High (swivel, tilt, extend) | Medium to Hard | Large rooms, multiple viewing angles |
This table provides a quick overview of how the different mount types stack up against each other. Consider your specific needs and room layout to choose the best option.
Key Considerations
Beyond the mount type, consider these other essential factors:
- Weight Capacity: The mount must safely support your TV's weight. Exceeding the weight limit could damage your wall or TV.
- VESA Compatibility: VESA (Video Electronics Standards Association) defines the mounting hole pattern on your TV's back. Ensure your mount is compatible with your TV’s VESA pattern.
- Wall Type: Different wall types require different mounting hardware. Drywall needs different anchors than concrete or brick.
Before starting the installation, ensure you have the necessary tools. The following infographic illustrates the essentials:
A stud finder, level, and drill are crucial for a secure and properly aligned installation. These tools will ensure your TV is mounted safely and straight. Preparation is key for a smooth installation process.
Future-Proofing Your Setup
When choosing a mount, think about your future needs. If you plan to upgrade to a larger TV, choose a mount with a higher weight capacity and a wider range of VESA compatibility. This forward-thinking approach can save you time and money down the road. It will make future upgrades easier and prevent you from having to replace your mount.
Step-By-Step Installation That Actually Works
Now that you've planned your installation and picked the perfect mount, let's dive into the installation process. This is where your careful planning truly shines. It's a bit like baking – you've gathered your ingredients and chosen your recipe, now it’s time to follow the steps.
Mounting the Wall Plate
The wall plate is the foundation of your entire TV mounting project. Mounting it correctly is absolutely crucial for a secure and stable setup. Think of it as the anchor holding a ship securely in place.
-
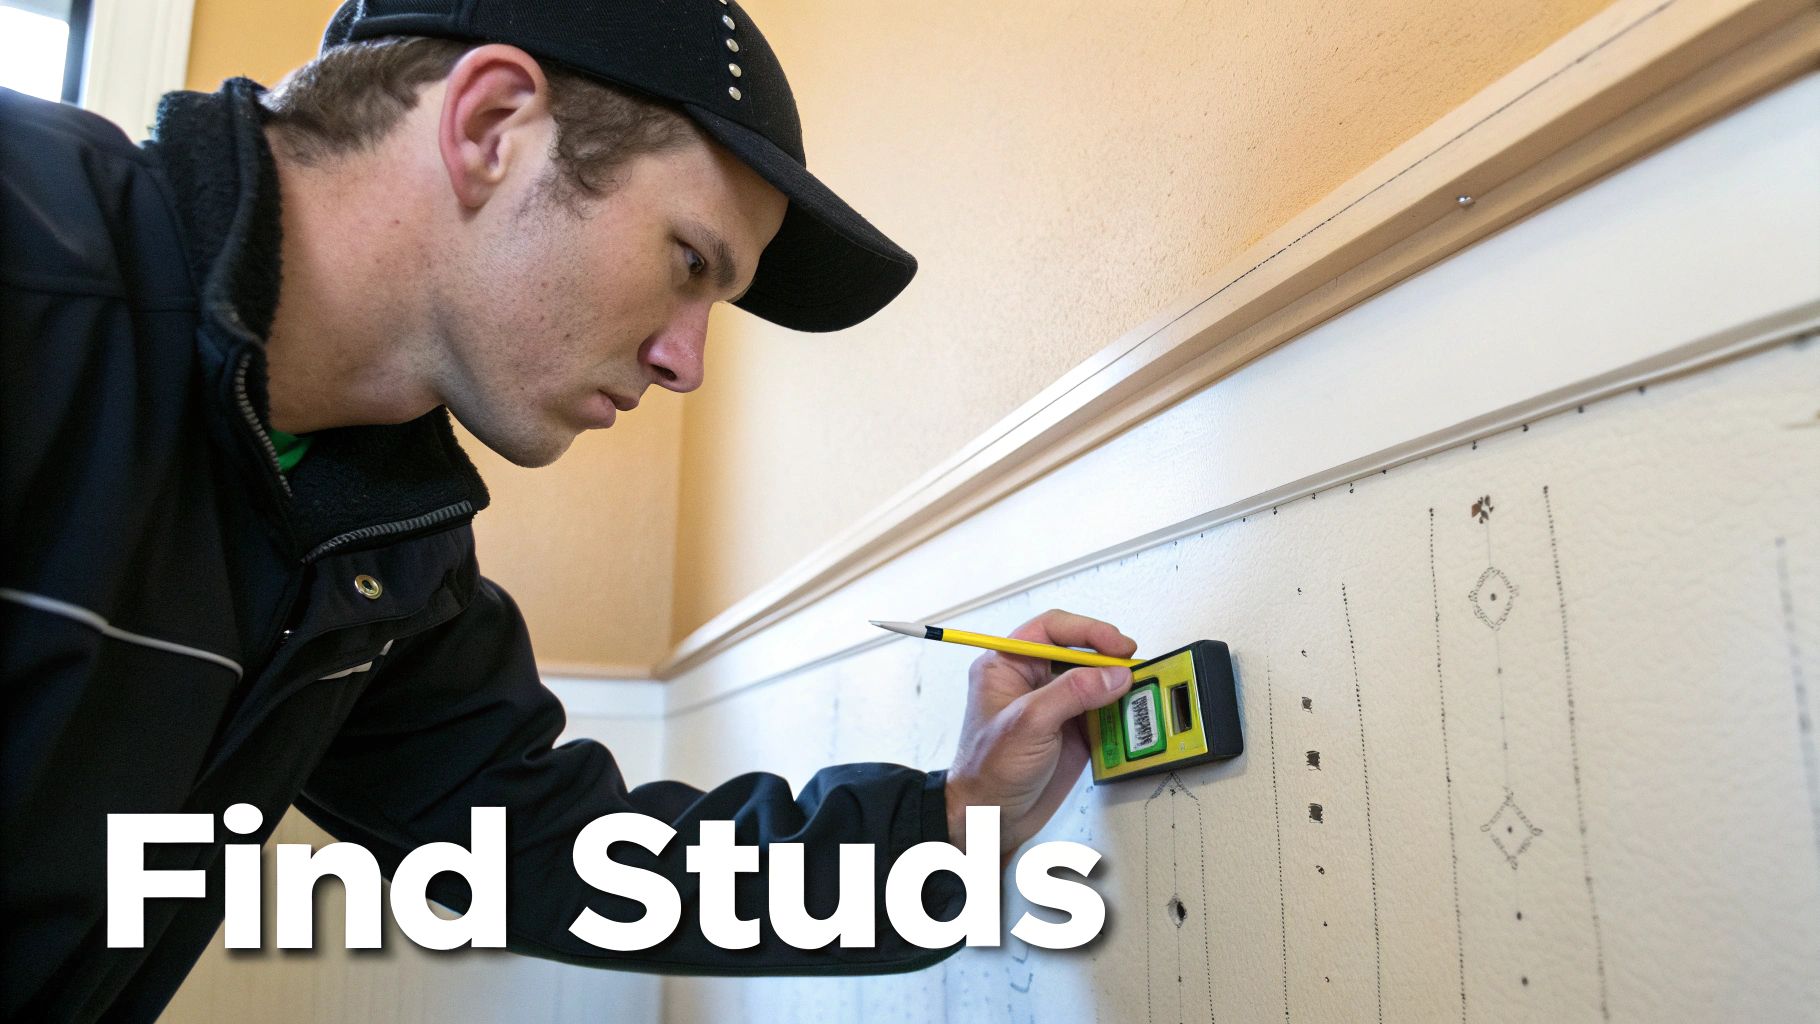
Locate Studs: Use a stud finder to accurately mark where your studs are located. These studs are the structural supports inside your wall, and attaching the wall plate directly to them is essential for a strong, reliable hold.
-
Pre-Drill Holes (if necessary): Depending on your wall type and the mount's instructions, you might need to pre-drill pilot holes. This is particularly important for tougher wall materials like concrete or brick.
-
Attach the Wall Plate: Carefully align the wall plate with the marked stud locations and secure it using the correct screws. Use a level to ensure the plate is perfectly straight.
-
Tighten Screws Securely: Make sure all screws are firmly tightened. However, avoid over-tightening, as this could damage the wall or the wall plate.
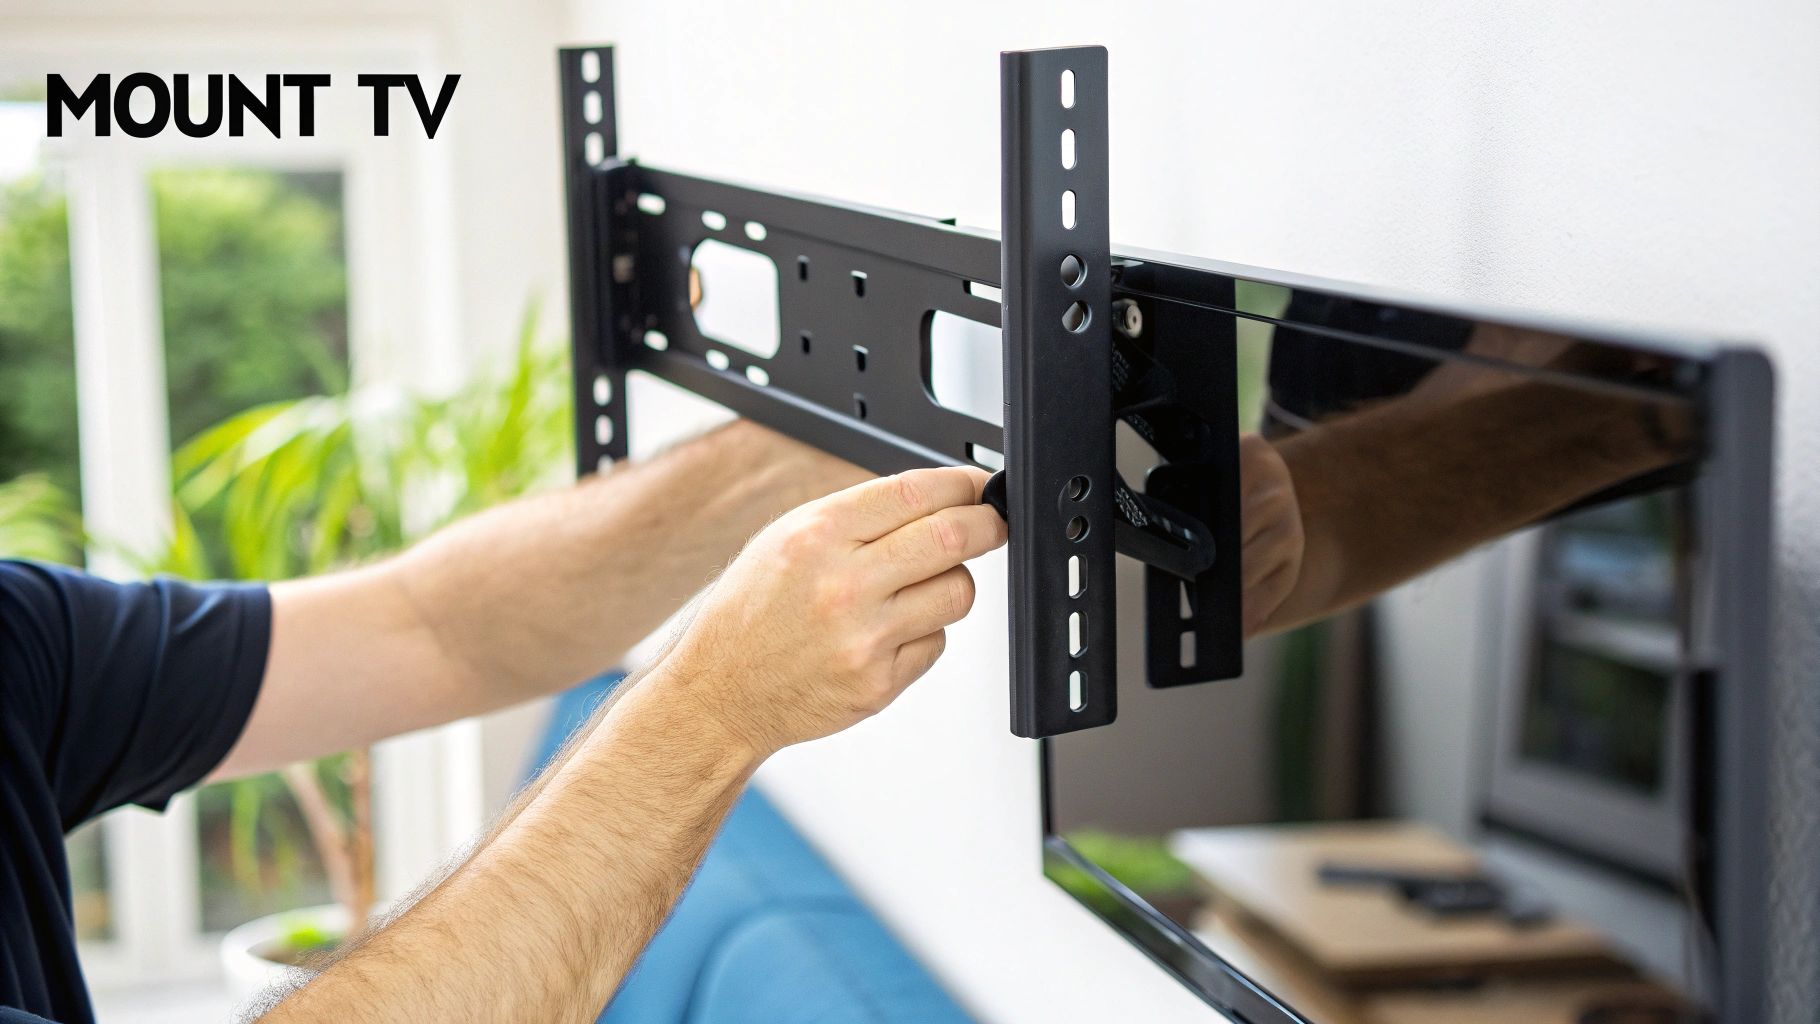
Attaching the Mounting Brackets to the TV
Next, attach the mounting brackets to the back of your TV. These brackets connect the TV to the wall plate, acting as the bridge between your TV and its wall-mounted support.
-
Align the Brackets: Carefully position the brackets according to the TV's VESA mounting holes and the mount manufacturer’s instructions. Precision is key here.
-
Secure with Screws: Use the screws provided with your mount to securely attach the brackets to the TV. Again, ensure the screws are tight but not over-tightened.
Securing the TV to the Wall Plate
With the wall plate and brackets installed, you're finally ready to mount the TV! This is the exciting part, but it’s crucial to stay focused and work carefully. It’s like putting the final piece into a complex puzzle.
-
Careful Alignment: With assistance from another person, carefully lift and align the TV's brackets with the wall plate. Double-check the alignment before securing the TV.
-
Secure the Connection: Follow the mount’s instructions precisely to connect the brackets to the wall plate. This might involve locking mechanisms, screws, or a combination of both.
-
Test the Stability: Gently move the TV to ensure it's securely mounted and doesn't wobble. This safety check is essential.
Final Adjustments and Cable Management
The final steps involve making adjustments and organizing the cables. These small details have a big impact on the overall look and function of your setup. Think of it as adding the finishing touches to a masterpiece.
-
Level and Adjust: Use a level to make sure your TV is perfectly straight. Some mounts allow for adjustments after installation to fine-tune the viewing angle.
-
Cable Management: Neatly bundle and conceal cables using cable ties, clips, or covers. Good cable management keeps your entertainment area looking clean and organized.
-
Final Check: Step back and admire your handiwork. Make sure all connections are secure, cables are managed, and your TV is positioned exactly how you envisioned.
Learn more in our article about How to Master Your TV Mount Installation. By following these detailed steps, you can confidently install your TV mount and create a professional-looking entertainment space. Remember to always put safety first and consult the manufacturer's instructions for your specific mount model.
Wall Types and Mounting Techniques for Maximum Safety
Your wall type plays a crucial role in how you mount a TV safely and securely. Choosing the wrong method could lead to damage to your wall, TV, or even injuries. This section covers proven mounting techniques for different wall types, from standard drywall to trickier materials like concrete and brick.
Drywall and Plaster: Finding the Studs
For drywall and plaster walls, locating and using wall studs is essential. Studs provide the necessary structural support to hold the weight of your TV. A reliable stud finder is a must-have tool for this. You might find this helpful: Check out our guide on tilting TV mounts. Once located, clearly mark the stud locations. This careful marking helps prevent misalignment when drilling.
For instance, if your stud finder indicates a stud, a light tap on the wall in that area should produce a solid thud. A hollow sound indicates a cavity between studs. Most stud finders can also differentiate between metal and wooden studs, which is important for selecting the correct drill bit. This allows you to drill confidently into the strongest part of the wall.
Concrete and Brick: Anchors and Drilling Techniques
Concrete and brick walls present a unique challenge. While exceptionally strong, they require specific anchors and drilling techniques. A basic understanding of construction is helpful when securing the TV mount. You can explore further with these cabinet installation techniques. Concrete anchors, also called masonry anchors, expand inside the drilled hole, creating a firm grip within the dense material.
Drilling into these materials requires a hammer drill and masonry drill bits. The hammer drill's percussive action breaks down the material, allowing the bit to penetrate effectively. Using the correct anchor size is also critical for maximizing the weight capacity and preventing the mount from pulling out.
Weight Capacity: Matching Your Mount to Your TV
Regardless of your wall type, understanding weight capacity is paramount. Both your chosen mount and its anchors must support the weight of your TV. Exceeding this limit is extremely risky and could result in your TV falling from the wall. Always check the manufacturer's specifications for both the mount and the anchors.
When to Call a Professional
While DIY installation can be satisfying, some situations require professional help. If your wall is particularly uneven, significantly damaged, or if you're simply not comfortable using power tools, a professional installer is the safest option. Their expertise can save you time, money, and potential problems. They can ensure the job is done right and safely the first time. Regional market trends are impacting the TV mounting industry. North America, with its high rate of advanced television adoption, holds a significant market share. In 2023, the North American market was valued at approximately $1.2 billion and is projected to grow. Learn more about TV mount market trends here.
Testing Your Installation
After installing your TV mount, test its stability. Gently but firmly try moving the TV in different directions. Any wobbling or looseness signals a problem that needs addressing immediately. This final step ensures your TV is securely mounted and prevents potential accidents. This check is crucial before trusting the installation with your valuable television.
Cable Management and Professional Finishing Touches
A successful TV installation isn't just about mounting the screen securely; it's about creating a polished look that elevates your viewing area. This involves thoughtful cable management and those all-important finishing touches. These final steps transform an average setup into something truly professional.
Taming the Cable Jungle: Concealment Strategies
Before any electrical work begins, always prioritize safety. A comprehensive electrical inspection checklist is a must-have. Unsightly cables can easily detract from a sleek new TV. Luckily, there are several ways to manage and conceal these wires effectively. In-wall cable routing, while more labor-intensive, offers the cleanest result, hiding wires completely within the wall.
For a simpler approach, external cable management solutions are great alternatives. Cable covers, raceways, and ties can neatly organize and hide wires along the wall surface. Many are paintable, blending seamlessly with your wall color for a clean aesthetic.
Power and Connection Considerations
Strategically plan power outlets and device connections. A surge protector behind the TV protects your electronics and consolidates power connections. For multiple HDMI connections, use clearly labeled HDMI switchers or splitters to keep things organized. This makes troubleshooting and future upgrades much easier.
Finishing Touches: The Professional Difference
Small details can make a significant impact. Wall touch-ups, such as patching and painting over old screw holes, create a polished finish. Securely install cable covers, ensuring they sit flush against the wall. Cable clips can keep wires tidy behind the TV. These seemingly minor touches truly elevate the final look.
Access and Future-Proofing
Maintain easy access to connections for future maintenance or upgrades. Don’t completely seal off access panels. Clearly label cables for easy identification down the line. This proactive approach saves time and potential frustration. A well-planned installation isn't just about today's setup; it's about adapting to future technology and evolving entertainment needs. By addressing cable management and adding those crucial finishing touches, you'll enjoy a professional-looking installation that enhances your viewing experience for years to come.
Troubleshooting Common Installation Problems
Even with the best planning, sometimes things don't go as smoothly as you'd like when installing a TV mount. Knowing how to troubleshoot these common problems can save you a lot of frustration and prevent a DIY disaster. This section addresses some typical issues and provides practical solutions.
Uneven Walls and Stud Placement Issues
One common challenge is dealing with uneven walls. This can make it difficult to get your TV level. Older homes, for example, often have walls that aren't perfectly plumb. Using shims behind the mount can help compensate for these irregularities and ensure your TV hangs straight.
Another issue is when studs aren't located where you need them. If you encounter this, consider using toggle bolts for a secure hold in drywall. You could also explore alternative mounting locations.
Bracket Alignment and Wall Support Problems
Aligning the mounting brackets perfectly can be tricky, especially with larger TVs. Even small misalignments can be noticeable. Carefully double-checking your measurements and using a level throughout the installation process is crucial.
Discovering your wall can't support the weight of your TV after you've started is a major setback. Always check the weight capacity beforehand. This means considering both the mount's capacity and the wall's ability to handle the combined weight.
The market for TV and monitor mounts shows a growing trend towards space-saving solutions. The global market, valued at approximately $9.5 billion in 2023, is projected to reach nearly $16.8 billion by 2032. Find more detailed statistics here.
Tilted TVs and Loose Connections
A tilted TV isn't just visually unappealing; it can also indicate a loose connection or an improperly installed mount. Make sure all screws are tightened and the mount sits flush against the wall.
Loose connections are a safety hazard and can lead to your TV falling. Double-checking every connection and using the correct hardware for your wall type are essential safety precautions.
Addressing Limited Range of Motion
If your mount doesn't offer the range of motion you expected, there might be a problem with the installation or the mount itself. Check that the mount is installed correctly and that all moving parts are working smoothly. If the issue persists, consider a different mount type that better suits your needs.
By understanding these common problems and using the suggested solutions, you can successfully install your TV mount and enjoy a perfectly positioned screen. A little patience and problem-solving can make a big difference in achieving a professional-looking result.
Maintenance and Long-Term Care for Your TV Mount
After you've mounted your TV, the next step is ensuring it stays secure and functional. Just like any other piece of equipment, your TV mount needs regular maintenance. This proactive approach not only safeguards your investment but also protects your family.
Regular Inspection: A Stitch in Time Saves Nine
Regularly inspecting your TV mount can prevent small issues from becoming big headaches. For instance, checking screws and bolts every three months can prevent loosening from vibrations or slight wall shifts. This is especially crucial in earthquake-prone areas.
- Check Screw Tightness: Make sure all screws and bolts are firmly secured.
- Inspect for Wear and Tear: Look for rust, cracks, or any damage to the mount.
- Examine Wall Condition: Check the wall around the mount for any signs of stress or damage.
Environmental Factors: Understanding the Impact
Temperature and humidity changes can affect the stability of your TV mount. These fluctuations can cause materials to expand and contract, potentially impacting the mount's integrity, especially with wooden studs or certain types of wall anchors.
- Humidity: Too much humidity can cause rust and corrosion, weakening the mount.
- Temperature: Drastic temperature swings can cause materials to expand and contract, affecting stability.
If you're looking for alternative mounting solutions, check out our guide on height-adjustable TV stands. Understanding how these factors impact your installation helps you avoid potential problems.
Preparing for Upgrades and Room Changes
When getting a new TV or rearranging your room, reassess your current mount. A heavier TV might exceed its weight limit.
- Weight Capacity: Confirm your mount can handle your new TV's weight.
- VESA Compatibility: Double-check that the mount's VESA pattern matches your new TV’s.
Professional Inspection: When to Seek Expert Advice
While DIY maintenance is helpful, sometimes you need a professional. If you see excessive tilting, wobbling, or wall damage, contact a professional installer. They can spot and fix issues you might miss. This prevents accidents and ensures long-term safety.
Warranty Considerations: Knowing Your Coverage
Knowing your warranty can save you money. Most manufacturers offer warranties for defects. Keep your receipts and warranty info handy for easy claims.
To help you stay on top of your TV mount maintenance, we've put together a handy schedule:
TV Mount Maintenance Schedule Recommended maintenance tasks and inspection intervals to keep your TV mount safe and functional
| Maintenance Task | Frequency | What to Check | Action Required |
|---|---|---|---|
| Check Screw Tightness | Every 3 months | All screws and bolts securing the mount and TV | Tighten any loose screws |
| Inspect for Wear and Tear | Every 6 months | The mount for rust, cracks, or damage | Replace if damaged |
| Examine Wall Condition | Annually | The wall around the mount for stress or damage | Consult a professional if needed |
This schedule provides a clear overview of essential maintenance tasks. Regularly checking these items can significantly extend the lifespan of your mount.
By following these tips, your TV mount will provide safe and reliable support for years. Preventative maintenance saves you money and prevents hazards.